
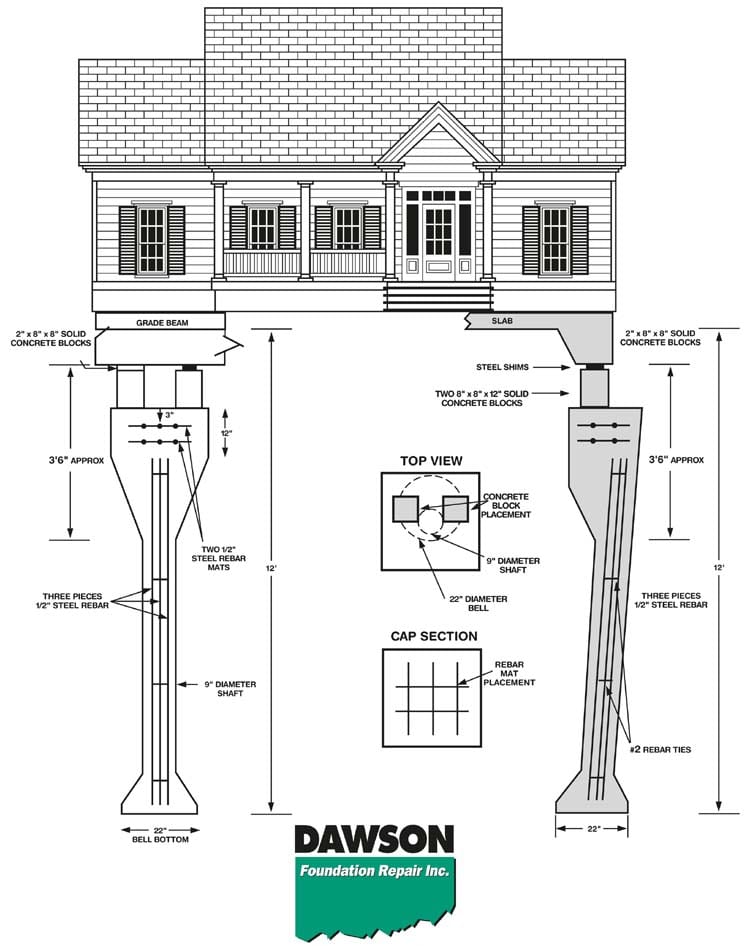
Dawson Foundation Repair utilizes a 9 point Quality Control program for the installation of Bell Bottom Piers. The purpose of this program is to ensure that every pier will support your home for the life of the home. These quality control steps take extra time and effort but our goal is to deliver the very best foundation repair and leveling that is offered in the Texas market. The illustration below shows the key parts of a bell bottom pier and how they are positioned under the home’s perimeter beam. Below is a short description of the 9 point Quality Control Program for Bell Bottom Pier installation.
Size of Box
The box is a rectangular hole dug beside the perimeter beam of the home or building. The box is measured and will be approximately 26 inches wide and 24 inches deep. The top portion of the finished bell bottom pier is called the cap and it is located in the lower portion of the box.
Size of Cone
The cone is the tapered portion of the bottom of the box and extends down to the 9 inch shaft. The cone is measured from the bottom of the perimeter beam to the bottom of the cone and should be approximately 42 inches.
Depth of Pier
The depth of the pier will vary depending on the soil test, which is done before the pier is dug. Most Bell Bottom piers will range from 8 to 12 feet from ground level to the bottom of the pier.
Angle of Shaft
The angle of shaft should be dug so that the bottom of the pier, the bell bottom, is under the perimeter beam of the home or building. This is done by both visual observation and using a plum line from the bottom center of the perimeter beam to the bottom of the pier.
Size of Bell Bottom
The bell bottom is dug with a special tool with collapsable flanges called the underreamer tool (aka the belling tool). When the flanges are fully extended the tool will carve out a 22 inch tapered foot called the bell bottom. The size of the bell is visually checked with an L-shaped tool called a bell checker.
Concrete Vibration
As an added quality effort, we vibrate the wet concrete after it has been poured into the excavated hole. This will eliminate any air pockets that may have been present.
Placing Steel Rebar
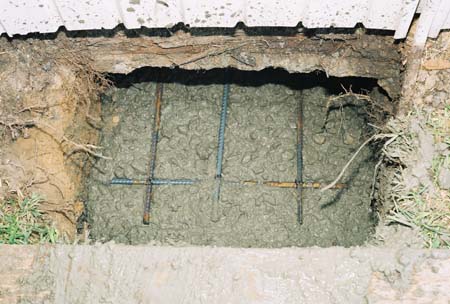
There are two sections of the Bell Bottom Pier that are reinforced with steel rebar. The first is the shaft. The shaft rebar is placed into the shaft after the bell bottom has been filled with concrete. Therefore the bottom portion of the shaft rebar is at or very close to the bottom of the shaft. The shaft rebar is positioned in the center of the shaft as the shaft is filled with concrete. The second section of the pier that is reinforced with steel rebar is the cap (see photo at left). These rebar sections are called the steel mats. The first steel mat is placed about 4 to 6 inches above the shaft and then covered with about 4 to 6 additional inches of concrete. Then the second steel mat is placed in the cap and another 4 to 6 inches of concrete is poured on top of it. This completes the construction of the Bell Bottom Pier.
Sprinkler System Check
Since there is considerable digging around the home or building foundation the workers will check the sprinkler system before digging begins and then after the digging is completed. If any lines were damaged or broken they will be repaired.
Landscape Lighting Check
Again, there will be a lot of digging around the foundation so the workers will also check the lighting system for the landscaping both before and after the job is completed.
click here to return to History of Bell Bottom Piers
click here to see a full scale illustration of Bell Bottom Piers